Youe Ads Here

Neobux
Site Name Per Click Ref Click Ads No. Payout
Site name How much pay per click How much pay per referral click number of ads available Minimum amount need to request payment
Neobux $0.02 $0.01 9+ $2
The best PTC ever! I already earned more than $12000 USD and I spend less than $500 to reach this profit! Neobux have many income ways like adprize, ptc ads, offers and jobs. Payments are always instant. Neobux pay by Payza, Paypal and Neteller.
Neobux
Payments Received: 35

Clixsense
Site Name Per Click Ref Click Ads No. Payout
Site name How much pay per click How much pay per referral click number of ads available Minimum amount need to request payment
Clixsense $0.02 $0.01 40+ $8
ClixSense has been online and paying since February 2007. Clicxsense have a 6 level downline system. In clixsense members can earn by ptc ads, clixgrid, offers and jobs. Payments are sent 2 times a week, members always receive payments in maximum 5 days.
Clixsense
Payments Received: 17

Trafficmocsoon
Site Name Per Click Ref Click Ads No. Payout
Site name How much pay per click How much pay per referral click number of ads available Minimum amount need to request payment
Beruby $0.02 $0.02 30+ $02
Share Up To 110 % - 10% Affiliate Program
Payments Received: 4


Showing posts with label Blogger wedgets. Show all posts

Monday, 13 February 2012

Create a Drop Down Menu In Blogger

Best Blogger Tips
A drop down menu is needed when you have too much content on your blog or you love keeping things organized. To add a drop down menu to your blogger blogs do this:


Sign in Your Blogger Account
Go To " Dashboard "
Click on " Design "


Select a HTML/JavaScript Widget just under the header and paste the following code inside it,


Here is " Html Code "
    <div id='mbtnavbar'>
          <ul id='mbtnav'>
            <li>
              <a href='#'>Home</a>
            </li>
            <li>
              <a href='#'>About</a>
           </li>
            <li>
              <a href='#'>Contact</a>
            </li>
      <li>
               <a href='#'>Sitemap</a>

                <ul>
                    <li><a href='#'>Sub Page #1</a></li>
                    <li><a href='#'>Sub Page #2</a></li>
                    <li><a href='#'>Sub Page #3</a></li>
                  </ul>
            </li>

          </ul>
        </div>

Important Tip

Replace # with your Page Links and the bolded text with relevant page names.

Next Step
Click on " Design " Tab
Click on " Edit Html " Tab
First of All Backup your template and Press " Ctrl + P "
Search this Code
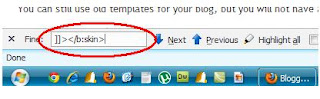
]]></b:skin>
Just above it paste the code below,

/*----- MBT Drop Down Menu ----*/

#mbtnavbar {
    background: #060505;
    width: 960px;
    color: #FFF;
        margin: 0px;
        padding: 0;
        position: relative;
        border-top:0px solid #960100;
        height:35px;
}

#mbtnav {
    margin: 0;
    padding: 0;
}
#mbtnav ul {
    float: left;
    list-style: none;
    margin: 0;
    padding: 0;
}
#mbtnav li {
    list-style: none;
    margin: 0;
    padding: 0;
        border-left:1px solid #333;
        border-right:1px solid #333;
        height:35px;
}
#mbtnav li a, #mbtnav li a:link, #mbtnav li a:visited {
    color: #FFF;
    display: block;
   font:normal 12px Helvetica, sans-serif;    margin: 0;
    padding: 9px 12px 10px 12px;
        text-decoration: none;
       
}
#mbtnav li a:hover, #mbtnav li a:active {
    background: #BF0100;
    color: #FFF;
    display: block;
    text-decoration: none;
        margin: 0;
    padding: 9px 12px 10px 12px;


}
#mbtnav li {
    float: left;
    padding: 0;
}
#mbtnav li ul {
    z-index: 9999;
    position: absolute;
    left: -999em;
    height: auto;
    width: 160px;
    margin: 0;
    padding: 0;
}
#mbtnav li ul a {
    width: 140px;
}
#mbtnav li ul ul {
    margin: -25px 0 0 161px;
}
#mbtnav li:hover ul ul, #mbtnav li:hover ul ul ul, #mbtnav li.sfhover ul ul, #mbtnav li.sfhover ul ul ul {
    left: -999em;
}
#mbtnav li:hover ul, #mbtnav li li:hover ul, #mbtnav li li li:hover ul, #mbtnav li.sfhover ul, #mbtnav li li.sfhover ul, #mbtnav li li li.sfhover ul {
    left: auto;
}
#mbtnav li:hover, #mbtnav li.sfhover {
    position: static;
}
#mbtnav li li a, #mbtnav li li a:link, #mbtnav li li a:visited {
    background: #BF0100;
    width: 120px;
    color: #FFF;
    display: block;
    font:normal 12px Helvetica, sans-serif;
    margin: 0;
    padding: 9px 12px 10px 12px;
        text-decoration: none;
z-index:9999;
border-bottom:1px dotted #333;
   
}
#mbtnav li li a:hover, #mbtnavli li a:active {
    background: #060505;
    color: #FFF;
    display: block;     margin: 0;
    padding: 9px 12px 10px 12px;
        text-decoration: none;
}


Custmizing
  • Change #060505 to change background color of the Main menu
  • Change  the yellow highlighted text to change font color, size and family
  • Change #BF0100 to change the background of a tab on mouse hover
  • Change #BF0100 to change the background color of the drop down menu
  • Change #060505 to change the background color of drop down menu on mouse hover
OK ----Now Click on " Save Template "

Open Your Blog and See The Result


Saturday, 4 February 2012

How To Add Floating Effect For Blogger Courser

Best Blogger Tips
How To Add Floating Effect For Blogger Courser
1. Log in to your blogger and Go to Design >> Edit HTML

2. Put checked marked in Expand Widget Templates

3. Find this tag by using Ctrl+F </head>  tag

4. Paste  below code before </head>  tag


<script type="text/javascript"> // <![CDATA[ var colour="#666666"; var sparkles=40; var x=ox=400; var y=oy=300; var swide=800; var shigh=600; var sleft=sdown=0; var tiny=new Array(); var star=new Array(); var starv=new Array(); var starx=new Array(); var stary=new Array(); var tinyx=new Array(); var tinyy=new Array(); var tinyv=new Array(); window.onload=function() { if (document.getElementById) { var i, rats, rlef, rdow; for (var i=0; i<sparkles; i++) { var rats=createDiv(3, 3); rats.style.visibility="hidden"; document.body.appendChild(tiny[i]=rats); starv[i]=0; tinyv[i]=0; var rats=createDiv(5, 5); rats.style.backgroundColor="transparent"; rats.style.visibility="hidden"; var rlef=createDiv(1, 5); var rdow=createDiv(5, 1); rats.appendChild(rlef); rats.appendChild(rdow); rlef.style.top="2px"; rlef.style.left="0px"; rdow.style.top="0px"; rdow.style.left="2px"; document.body.appendChild(star[i]=rats); } set_width(); sparkle(); }} function sparkle() { var c; if (x!=ox || y!=oy) { ox=x; oy=y; for (c=0; c<sparkles; c++) if (!starv[c]) { star[c].style.left=(starx[c]=x)+"px"; star[c].style.top=(stary[c]=y)+"px"; star[c].style.clip="rect(0px, 5px, 5px, 0px)"; star[c].style.visibility="visible"; starv[c]=50; break; } } for (c=0; c<sparkles; c++) { if (starv[c]) update_star(c); if (tinyv[c]) update_tiny(c); } setTimeout("sparkle()", 40); } function update_star(i) { if (--starv[i]==25) star[i].style.clip="rect(1px, 4px, 4px, 1px)"; if (starv[i]) { stary[i]+=1+Math.random()*3; if (stary[i]<shigh+sdown) { star[i].style.top=stary[i]+"px"; starx[i]+=(i%5-2)/5; star[i].style.left=starx[i]+"px"; } else { star[i].style.visibility="hidden"; starv[i]=0; return; } } else { tinyv[i]=50; tiny[i].style.top=(tinyy[i]=stary[i])+"px"; tiny[i].style.left=(tinyx[i]=starx[i])+"px"; tiny[i].style.width="2px"; tiny[i].style.height="2px"; star[i].style.visibility="hidden"; tiny[i].style.visibility="visible" } } function update_tiny(i) { if (--tinyv[i]==25) { tiny[i].style.width="1px"; tiny[i].style.height="1px"; } if (tinyv[i]) { tinyy[i]+=1+Math.random()*3; if (tinyy[i]<shigh+sdown) { tiny[i].style.top=tinyy[i]+"px"; tinyx[i]+=(i%5-2)/5; tiny[i].style.left=tinyx[i]+"px"; } else { tiny[i].style.visibility="hidden"; tinyv[i]=0; return; } } else tiny[i].style.visibility="hidden"; } document.onmousemove=mouse; function mouse(e) { set_scroll(); y=(e)?e.pageY:event.y+sdown; x=(e)?e.pageX:event.x+sleft; } function set_scroll() { if (typeof(self.pageYOffset)=="number") { sdown=self.pageYOffset; sleft=self.pageXOffset; } else if (document.body.scrollTop || document.body.scrollLeft) { sdown=document.body.scrollTop; sleft=document.body.scrollLeft; } else if (document.documentElement && (document.documentElement.scrollTop ||
document.documentElement.scrollLeft)) {
sleft=document.documentElement.scrollLeft; sdown=document.documentElement.scrollTop; } else { sdown=0; sleft=0; } } window.onresize=set_width; function set_width() { if (typeof(self.innerWidth)=="number") { swide=self.innerWidth; shigh=self.innerHeight; } else if (document.documentElement && document.documentElement.clientWidth) { swide=document.documentElement.clientWidth; shigh=document.documentElement.clientHeight; } else if (document.body.clientWidth) { swide=document.body.clientWidth; shigh=document.body.clientHeight; } } function createDiv(height, width) { var div=document.createElement("div"); div.style.position="absolute"; div.style.height=height+"px"; div.style.width=width+"px"; div.style.overflow="hidden"; div.style.backgroundColor=colour; return (div); } // ]]> </script>

Saturday, 28 January 2012

Add A Stylish Scrolling Sidebar Widget In Blogger

Best Blogger Tips

Add A Stylish Scrolling Sidebar Widget In Blogger


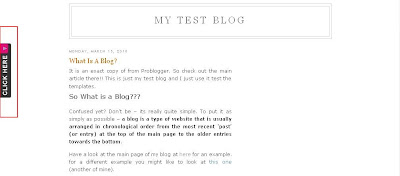
Last night, when I was browsing for information about making blogger blogs look more stylish and professional, I found a beautiful widget that will scroll along the page as and when you scroll up or down. What attracted me, is the gliding movement of the widget to display the important links for your blog. You may use this widget to display some of the best posts in your blog or some important links. Look at the red box in the picture below. If you are still confused, please have a look at the demo in my test blog by clicking here -  
stylish-scrolling-sidebar 

I am pretty sure everyone would love to add this widget in their blog. There are lots of customizations with this widget. For example, you may ask the advertisers to place their ads in this widget or display your social networking links. The only disadvantage is that, it will take a little bit of time to load since it works on a JavaScript. Any way, let us get to our work by installing this stylish widget in our blogger blogs.

1. Go to "Design->Edit HTML. Make a backup of your template before modifying the HTML by clicking on the "Download full template" link at the top of the page.
2. Search for the following line in your template. Use "CTRL+F" to fasten your search.


<body>


3. Download the text document - Stylish Scrolling Widget For Blogger Blogs.
4. Now, open the text document, copy the entire code and paste it just below the line you searched in step 2.
5. Change the code that says "Your Link 1, Your Link 2 and so on" with the links you wish to display in your blog. You may even change the text "USEFUL LINKS" with some other name, which gets displayed in the widget on hitting the "CLICK HERE" tab.
(Note: For any other customization with this widget, please feel free to leave your comments and I will help you customize them as per your request.)
6. Save your template and view your blog. You will find the widget installed successfully.

I made this post as simple as possible. I hope you enjoyed this post. As I said earlier, feel free to leave your comments here. You may even add the codes using the "HTML/Javascript" option in the "Design->Add Page elements" page. So, just give this widget a try!!


Automatic Content Slider for Blogger using Nivo Slider

Best Blogger Tips


 Automatic Content Slider for Blogger using Nivo Slider part 2


The following is how it looks
Nivo Slider with Orman theme


Step 1 : Apply Style

  1. Login to Blogger Dashboard and navigate to Layout > Edit Html
  2. Don’t click the checkbox which says ‘Expand Widget Templates’
  3. Find this
]]></b:skin>


Then insert the script in front of it


 /* START
--------------------------------------------------------------------
 Automatic Content Slider for Blogger using Nivo Slider
 By http://www.everythings2012.co.cc
--------------------------------------------------------------------
 Nivo Slider
*/
/*-----START Orman Theme ----------------------------------------*/
.theme-orman.slider-wrapper {
 background:url(http://i1133.photobucket.com/albums/m596/abu-farhan/nivo-
slider/Orman/slider.png) no-repeat; width:722px;
 height:337px;
 margin:0 auto;
 padding-top:18px;
 position:relative;
}
.theme-orman .nivoSlider {
 position:relative;
 width:568px;
 height:268px;
 margin-left:77px;
 background:url(http://i1133.photobucket.com/albums/m596/abu-farhan/nivo-
slider/Orman/loading.gif) no-repeat 50% 50%;}
.theme-orman .nivoSlider img {
 position:absolute;
 top:0px;
 left:0px;
 display:none;
 width:568px; /* Make sure your images are the same size */
 height:268px; /* Make sure your images are the same size */
}
.theme-orman .nivoSlider a {
 border:0;
 display:block;
}
.theme-orman .nivo-controlNav {
 position:absolute;
 left:50%;
 bottom:-60px;
 margin-left:-30px; /* Tweak this to center bullets */
}
.theme-orman .nivo-controlNav a {
 display:block;
 width:10px;
 height:10px;
 background:url(http://i1133.photobucket.com/albums/m596/abu-farhan/nivo-
slider/Orman/bullets.png) no-repeat;
 text-indent:-9999px;
 border:0;
 margin-right:7px;
 float:left;
}
.theme-orman .nivo-controlNav a.active {
 background-position:0 -10px;
}
.theme-orman .nivo-directionNav a {
 display:block;
 width:25px;
 height:200px;
 background:url(http://i1133.photobucket.com/albums/m596/abu-farhan/nivo-
slider/Orman/arrows.png) no-repeat 0% 50%; text-indent:-9999px;
 border:0;
 top:40px;
}
.theme-orman a.nivo-nextNav {
 background-position:100% 50%;
 right:-40px;
 padding-right:20px;
}
.theme-orman a.nivo-prevNav {
 left:-40px;
 padding-left:20px;
}
.theme-orman .nivo-caption {
 font-family: Helvetica, Arial, sans-serif;
}
.theme-orman .nivo-caption a {
 color:#fff;
 border-bottom:1px dotted #fff;
}
.theme-orman .nivo-caption a:hover {
 color:#fff;
}
.theme-orman .ribbon {
 background:url(http://i1133.photobucket.com/albums/m596/abu-farhan/nivo
-slider/Orman/ribbon.png) no-repeat; width:111px;
 height:111px;
 position:absolute;
 top:-3px;
 left:56px;
 z-index:300;
}
/*----- END Orman Theme ----------------------------------------*/
/* The Nivo Slider styles */
.nivoSlider {
 position:relative;
}
.nivoSlider img {
 position:absolute;top:0px;left:0px;
}
/* If an image is wrapped in a link */
.nivoSlider a.nivo-imageLink {
 position:absolute;top:0px;left:0px;width:100%;height:100%;border:0;
 padding:0;margin:0;z-index:6;display:none;
}
/* The slices and boxes in the Slider */
.nivo-slice {
 display:block;
 position:absolute;
 z-index:5;
 height:100%;
}
.nivo-box {
 display:block;
 position:absolute;
 z-index:5;
}
/* Caption styles */
.nivo-caption {
 position:absolute;
 left:0px;
 bottom:0px;
 background:#000;
 color:#fff;
 opacity:0.8; /* Overridden by captionOpacity setting */
 width:100%;
 z-index:8;
}
.nivo-caption p {
 padding:5px;
 margin:0;
}
.nivo-caption a {
 display:inline !important;
}
.nivo-html-caption {
 display:none;
}
/* Direction nav styles (e.g. Next & Prev) */
.nivo-directionNav a {
 position:absolute;
 top:45%;
 z-index:9;
 cursor:pointer;
}
.nivo-prevNav {
 left:0px;
}
.nivo-nextNav {
 right:0px;
}
/* Control nav styles (e.g. 1,2,3...) */
.nivo-controlNav a {
 position:relative;
 z-index:9;
 cursor:pointer;
}
.nivo-controlNav a.active {
 font-weight:bold;
}
.theme-default #slider {
 margin:100px auto 50px auto;
 width:618px; /* Make sure your images are the same size */
 height:246px; /* Make sure your images are the same size */
}
.theme-pascal.slider-wrapper,
.theme-orman.slider-wrapper {
 margin-top:150px;
}
.clear {
 clear:both;
}
/* END
--------------------------------------------------------------------
 Automatic Content Slider for Blogger using Nivo Slider
 By http://everythings2012.co.cc
--------------------------------------------------------------------
 Nivo Slider
*/

Step 2 : Apply Javascript

Find This :
</body>
Then insert the script in front of it
<!-- jQuery -->
<script src='http://ajax.googleapis.com/ajax/libs/jquery/1.6/jquery.
min.js' type='text/javascript'/>
 <script src='http://catur-at-abu-farhan.googlecode.com/svn/trunk/nivo-
slider-modified.min.js' type='text/javascript'/>
 <script type='text/javascript'>
 $(window).load(function() {
 $(&#39;#slider&#39;).nivoSlider();
 });
 </script>

Step 3 : Apply Gadget

Design -> Click on “Add a Gadget” -> HTML/JavaScript type.
<div class="slider-wrapper theme-orman">
<div class="ribbon"></div>
 <script style="text/javascript" src="http://catur-at-abu-farhan.
googlecode.com/svn/trunk/galleryposts-nivo-slider.js"></script>
<script style="text/javascript">
 var numposts_gal = 6;   //number of posts
 var image_height = 270; //image height
 var image_width = 570;  //image width
</script>
<script src="http://abu-farhan-demo.blogspot.com/feeds/posts/default?
orderby=published&alt=json-in-script&callback=showgalleryposts"></script>
</div>

Demo
if you have any questions please leave a comment….thx u


Tuesday, 17 January 2012

Add The Numbered Next And Previous Page Navigation Gadget Under Your Blog Posts

Best Blogger Tips
Once again we are trying to make it easy for people to navigate your blog.The easier it is for people to Navigate you blog the more likely it is they will stay and become return visitors.I'm sure you have seen this script used on lots of blogs and thought 'I would like that on my blog'.You probably thought adding it to your blog would be hard but once again i have a nice easy piece of code you can add to achieve the effect.
Numbered Next And Previous Page Navigation Gadget
So what exactly is the page navigation widget.


Basically when someone reaches the end of a post they have the option to go to the next page, previous page or click a number to skip to that post, Its something we see on millions of web pages even the Google search page.

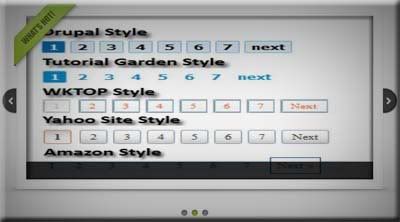
Here is how it looks on my blog :

You can see it starting from the first page with just the next option, in the image at the top of the post you how it looks with next and previous.


Page nav for blogger


You can try it out at the bottom of this post, However the template i am using is a specialized template using a specialized read more function that shows posts in a preview box not only on the home page but on all pages so it will work much better on your blog than mine.On your blog it will skip to the the full page of your next post.

Adding it to your blog

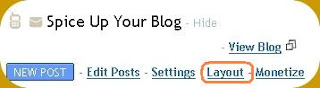
Step 1. Click 'Layout' > 'Add a gadget' for your blog

Blogger layout


add a gadget blogger


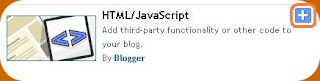
Step 2. Choose Html/Javascript

add html javascript blogger

Remember you can get all these tips sent directly to your email and stay a step ahead.Its quick easy and of course a free service provided by Google just fill in the form below the post.

Step 3. Copy the code below and paste it into the Html/Javascript area provided :
(There is a lot of code so be careful to get it all)
<script type="text/javascript">

var home_page_url = location.href;


var pageCount=1;
var displayPageNum=3;
var upPageWord ='Previous';
var downPageWord ='Next';


function showpageCount(json) {
var thisUrl = home_page_url;
var htmlMap = new Array();
var thisNum = 1;
var postNum=1;
var itemCount = 0;
var fFlag = 0;
var eFlag = 0;
var html= '';
var upPageHtml ='';
var downPageHtml ='';


for(var i=0, post; post = json.feed.entry[i]; i++) {

var timestamp1 = post.published.$t.substring(0,19)+post.published.$t.substring(23,29);
timestamp = encodeURIComponent(timestamp1);


var title = post.title.$t;

if(title!=''){
if(itemCount==0 || (itemCount % pageCount ==(pageCount-1))){
if(thisUrl.indexOf(timestamp)!=-1 ){
thisNum = postNum;
}

if(title!='') postNum++;
htmlMap[htmlMap.length] = '/search?updated-max='+timestamp+'&max-results='+pageCount;
}
}
itemCount++;

}

for(var p =0;p< htmlMap.length;p++){
if(p>=(thisNum-displayPageNum-1) && p<(thisNum+displayPageNum)){
if(fFlag ==0 && p == thisNum-2){
if(thisNum==2){
upPageHtml = '<span class="showpage"><a href="/">'+ upPageWord +'</a></span>';
}else{
upPageHtml = '<span class="showpage"><a href="'+htmlMap[p]+'">'+ upPageWord +'</a></span>';
}

fFlag++;
}

if(p==(thisNum-1)){
html += '<span class="showpagePoint">'+thisNum+'</span>';
}else{
if(p==0){
html += '<span class="showpageNum"><a href="/">1</a></span>';

}else{
html += '<span class="showpageNum"><a href="'+htmlMap[p]+'">'+ (p+1) +'</a></span>';
}
}

if(eFlag ==0 && p == thisNum){
downPageHtml = '<span class="showpage"> <a href="'+htmlMap[p]+'">'+ downPageWord +'</a></span>';
eFlag++;
}
}
}

if(thisNum>1){
html = ''+upPageHtml+' '+html +' ';
}

html = '<div class="showpageArea"><span class="showpageOf"> Pages ('+(postNum-1)+')</span>'+html;

if(thisNum<(postNum-1)){
html += downPageHtml;
}

if(postNum==1) postNum++;
html += '</div>';


var pageArea = document.getElementsByName("pageArea");
var blogPager = document.getElementById("blog-pager");

if(postNum <= 2){
html ='';
}

for(var p =0;p< pageArea.length;p++){
pageArea[p].innerHTML = html;
}

if(pageArea&&pageArea.length>0){
html ='';
}

if(blogPager){
blogPager.innerHTML = html;
}


}


function showpageCount2(json) {

var thisUrl = home_page_url;
var htmlMap = new Array();
var isLablePage = thisUrl.indexOf("/search/label/")!=-1;
var thisLable = isLablePage ? thisUrl.substr(thisUrl.indexOf("/search/label/")+14,thisUrl.length) : "";
thisLable = thisLable.indexOf("?")!=-1 ? thisLable.substr(0,thisLable.indexOf("?")) : thisLable;
var thisNum = 1;
var postNum=1;
var itemCount = 0;
var fFlag = 0;
var eFlag = 0;
var html= '';
var upPageHtml ='';
var downPageHtml ='';


var labelHtml = '<span class="showpageNum"><a href="/search/label/'+thisLable+'?&max-results='+pageCount+'">';
var thisUrl = home_page_url;


for(var i=0, post; post = json.feed.entry[i]; i++) {

var timestamp1 = post.published.$t.substring(0,19)+post.published.$t.substring(23,29);
timestamp = encodeURIComponent(timestamp1);


var title = post.title.$t;

if(title!=''){
if(itemCount==0 || (itemCount % pageCount ==(pageCount-1))){
if(thisUrl.indexOf(timestamp)!=-1 ){
thisNum = postNum;
}

if(title!='') postNum++;
htmlMap[htmlMap.length] = '/search/label/'+thisLable+'?updated-max='+timestamp+'&max-results='+pageCount;

}
}
itemCount++;
}

for(var p =0;p< htmlMap.length;p++){
if(p>=(thisNum-displayPageNum-1) && p<(thisNum+displayPageNum)){
if(fFlag ==0 && p == thisNum-2){
if(thisNum==2){
upPageHtml = labelHtml + upPageWord +'</a></span>';
}else{
upPageHtml = '<span class="showpage"><a href="'+htmlMap[p]+'">'+ upPageWord +'</a></span>';
}

fFlag++;
}

if(p==(thisNum-1)){
html += '<span class="showpagePoint">'+thisNum+'</span>';
}else{
if(p==0){
html = labelHtml+'1</a></span>';
}else{
html += '<span class="showpageNum"><a href="'+htmlMap[p]+'">'+ (p+1) +'</a></span>';
}
}

if(eFlag ==0 && p == thisNum){
downPageHtml = '<span class="showpage"> <a href="'+htmlMap[p]+'">'+ downPageWord +'</a></span>';
eFlag++;
}
}
}

if(thisNum>1){
if(!isLablePage){
html = ''+upPageHtml+' '+html +' ';
}else{
html = ''+upPageHtml+' '+html +' ';
}
}

html = '<div class="showpageArea"><span class="showpageOf"> Pages ('+(postNum-1)+')</span>'+html;

if(thisNum<(postNum-1)){
html += downPageHtml;
}

if(postNum==1) postNum++;
html += '</div>';

var pageArea = document.getElementsByName("pageArea");
var blogPager = document.getElementById("blog-pager");

if(postNum <= 2){
html ='';
}

for(var p =0;p< pageArea.length;p++){
pageArea[p].innerHTML = html;
}

if(pageArea&&pageArea.length>0){
html ='';
}

if(blogPager){
blogPager.innerHTML = html;
}


}


</script>
<script type="text/javascript">

var thisUrl = home_page_url;
if (thisUrl.indexOf("/search/label/")!=-1){
if (thisUrl.indexOf("?updated-max")!=-1){
var lblname1 = thisUrl.substring(thisUrl.indexOf("/search/label/")+14,thisUrl.indexOf("?updated-max"));
}else{
var lblname1 = thisUrl.substring(thisUrl.indexOf("/search/label/")+14,thisUrl.indexOf("?&max"));
}
}

var home_page = "/";
if (thisUrl.indexOf("?q=")==-1){
if (thisUrl.indexOf("/search/label/")==-1){
document.write('<script src="'+home_page+'feeds/posts/summary?alt=json-in-script&callback=showpageCount&max-results=99999"><\/script>')
}else{document.write('<script src="'+home_page+'feeds/posts/full/-/'+lblname1+'?alt=json-in-script&callback=showpageCount2&max-results=99999"><\/script>')
}
}
</script>


Once you paste in the code click save


You will now want to place the gadget under your posts.
Click on the gadgat and 'Drag and Drop it' below the post area as shown below :


Once you have the gadget under your posts click the save button in the top Right of the layout page.

How To Put A Related Posts With Images Gadget Under Your Blog Posts

Best Blogger Tips
One of the most popular related posts gadgets for Blogger users is the related posts with thumbnails provided by linkwithin.The easy installation and clean look of the gadget makes it an easy choice for most bloggers.However the linkwithin gadget does not suit everyone and does not work with every template for example the template I'm currently using will not display that gadget properly.If your having similar issues with the linkwithin gadget don't worry, in this post i will show you how to use an almost identical gadget that is coded to work well for all blogger templates.

Note - We have recently published a new improved version : New Related Posts With Thumbnails Blogger.


If your not familiar with the related posts with thumbnails gadgets lets look at how it works, whats displayed and were it appears.The gadget will be located below all your posts and will list a number of posts (The number is specified by you) that are related to the post it appears under.In order to display related posts the gadget uses the labels used in each post and lists posts using the same labels.Along with the post title this gadget displays a thumbnail (Small version of an image you used in the post) and a short description of the post although this is optional.

large blogger square logo
 

How To Add The Recent Posts With Thumbnails To Your Blog


Step 1. In your dashboard click 'Layout' > 'Edit Html' > Tick the 'expand widget templates' box


Blogger layout


edit html blogger


Expand widget templates blogger


Step 2. In your templates Html find the following piece of code :
(Click Ctrl and F for a search bar to help find the code - More Info)


</head>


Step 3. Place the following code Directly Above/Before </head>


<script src='http://www.sigmirror.com/files/49136_fib7l/relatedpost.txt' type='text/javascript'/>

<!--http://mysecrets2012.blogspot.com/-->
<b:if cond='data:blog.pageType == "item"'>
<style type='text/css'>
#related-posts {
float:center;
text-transform:none;
height:100%;
min-height:100%;
padding-top:5px;
padding-left:5px;
}

#related-posts h2{
font-size: 1.6em;
font-weight: bold;
color: black;
font-family: Georgia, “Times New Roman”, Times, serif;
margin-bottom: 0.75em;
margin-top: 0em;
padding-top: 0em;
}
#related-posts a{
color:black;
}
#related-posts a:hover{
color:black;
}

#related-posts a:hover {
background-color:#d4eaf2;
}
</style>


<script src='http://blogergadgets.googlecode.com/files/relatedthumbs21.js' type='text/javascript'/>
</b:if>
<!--http://mysecrets2012.blogspot.com/-->


Step 4. Find the following piece of code in your blogs html :


<data:post.body/>


If <data:post.body/> appears in your template twice use the second occurrence.

Step 5. Place the following piece of code Directly Below / Under <data:post.body/>


<!-- http://mysecrets2012.blogspot.com/-->
<b:if cond='data:blog.pageType == &quot;item&quot;'>
<div id='related-posts'>
<b:loop values='data:post.labels' var='label'>
<b:if cond='data:label.isLast != &quot;true&quot;'>
</b:if>
<b:if cond='data:blog.pageType == &quot;item&quot;'>
<script expr:src='&quot;/feeds/posts/default/-/&quot; + data:label.name + &quot;?alt=json-in-script&amp;callback=related_results_labels_thumbs&amp;max-results=6&quot;' type='text/javascript'/></b:if></b:loop><a href='http://www.spiceupyourblog.com' target='_blank'><small>Get This Gadget</small></a>
<script type='text/javascript'>
var currentposturl=&quot;<data:post.url/>&quot;;
var maxresults=10;
var relatedpoststitle=&quot;Related Posts&quot;;
removeRelatedDuplicates_thumbs();
printRelatedLabels_thumbs();
</script>
</div><div style='clear:both'/>
</b:if>
<!-- http://mysecrets2012.blogspot.com/-->
Note : You can change the amount of related posts to be displayed by changing the maxresults=6 as highlighted above in red.
You can change the title above the gadget by changing the text Related Posts highlighted in red above.


InfoRemember you can get all these tips sent directly to your email and stay a step ahead.Its a quick and easy service Provided for Free by Google.Just fill in the Email form below the post.
If you need extra help on this or any tutorial just leave a comment, I love comments and feedback so this Blog is Do-Follow - when you comment here it helps Your Blogs Google rank !


This is a nice gadget that will keep people on your blog looking through your archive, a vital factor in building a following for your blog.

jQuery Animated Welcome Message For Blogger

Best Blogger Tips
One of the popular plugins for Wordpress blogs is the Blog Welcome Message which is displayed above or below the post titles on blogs.In this post i will show you how to add a similar welcome message to Blogger.The Blog welcome message uses an animated effect, it fades in and out when the reader first lands on your page to grab their attention.You can add any text to the message along with a thumbnail image, also readers can collapse and hide the message.I have created three welcome messages you can use and i will show you how to add them to your blog.I will also show you how to edit every part of the message like text, colors, image and more.

I have created 3 samples to give you an idea of how you can use the message on your blog.


Working Demo 1 - See a demo of a Rss Feed welcome message above post titles Here

Working Demo 2 - See a demo of a Twitter Welcome message below post titles Here

Working demo 3 - See a demo of a Facebook Welcome message below posts Here

Adding The Welcome Message To Blogger

Rss Feed Welcome Message - Below is the message with the Rss Feed link, you can use this message and simply change the feed link to yours.Instructions are below to completely change the message and use another image and different text.

<b:if cond='data:blog.pageType == &quot;item&quot;'>
<a href='http://www.spiceupyourblog.com'><img alt='Best Blogger Tips' src='https://blogger.googleusercontent.com/img/b/R29vZ2xl/AVvXsEjGhH4GT_1D8AFyqSIPYvfgHgIplbjKOlo4N7RHGpD8M0W1GxTZC5Z3gAdBhLWDL8bec6OEE4DnqxHhM2VoSi3FIB9WVAgqHKm3oxIBYHgxxiukqihS7gor0gMLBJ-lwbCEa7n2LgMA9_Hl/s1600/best+blogger+tips.png'/></a><style>

#info{

border: 1px solid;

margin: 10px 0px;

padding:15px 10px 15px 50px;

background-repeat: no-repeat;

background-position: 10px center;

position:relative;

color: #00529B;

background-color: #BDE5F8;

background-image: url('https://blogger.googleusercontent.com/img/b/R29vZ2xl/AVvXsEixkNeDkK9MKwkKLWFN9EjydRIM165EvyrcpyERhYu4jjkw4rdskQBv-fO1yLpxsDbyZ5QU4-BHfJWc3D_K4EfHBPIEpWHpbp8sX871fIkttFip1Kx43TdDeLUtvfWRTOGOoAWCWAnyH7Xr/s1600/rss-mini.png');

}

</style><script src="http://code.jquery.com/jquery-1.2.3.min.js" type="text/javascript">

</script>


<script type="text/javascript">

$(document).ready(function(){

$(".close").click(function(){

$("#info").animate({left:"+=10px"}).animate({left:"-5000px"});

});

$("#info").fadeOut(800).fadeIn(800).fadeOut(400).fadeIn(400)

.fadeOut(400).fadeIn(400);

});


</script>

<div id="info">

<a class="close" href="#close" style="float: right;"><img border="0" src="https://blogger.googleusercontent.com/img/b/R29vZ2xl/AVvXsEjC-LQfKDgsWzOn92-nxT46LaYrkLqnD1JcTADsdIBck9SlG808q1COiJuzcrq0Yjr0B8PVNoxk3nFLe6egTH3DtNPabZCLT6vs73FTQVeDnsfIvNaOyBWdsmlLo30iwBJ8dwakwHhmr1Gv/s1600/close+message.png" /></a>

</b:if>

*To change the Rss Mini image replace the Image URL in red.
*The code in orange is the Text Message and Rss link replace them with your own message and image.
*Change the text color edit - color: #00529B;
*Change the background color edit - background-color: #BDE5F8;
Get color codes here - Color Code Generator


Images from demos - If you want to use the facebook or Twitter images from the demos here are the codes :


https://blogger.googleusercontent.com/img/b/R29vZ2xl/AVvXsEjCah9IqHi5Ph-SDl00GBWJYZ4G6ns47HmI_K0cMaPXMQXDlwa8epAP3ksFj6XEsZcQNyKmzpGUBP74Zqq7GuXqX_i2HO0HqMEgCYOg5UoF15NHhAYSRq1TKEc1F9nG34U2eI-2RdNsnosR/s1600/fb-mini.png

https://blogger.googleusercontent.com/img/b/R29vZ2xl/AVvXsEjIk8Q-3TyYnH3nLcr_bVyrmBxKITdMM-S6vOS8U11SOeL_1c61CZ6X_z5raPI2pgvkfIN7EiItnfRsaSw-y2PcnzXzOvFqqgdjPlO46BJn9d5IQTao-0yQ8Tmp9rHz0aNye9oEGgQT-C1V/s1600/twitter-mini.png

OK so you have the code for your message lets add it to your blog !

List Only Post Titles On Blogger Labels Pages

Best Blogger Tips
In this post i will show you a really Great trick that helps make your Blog much easier to Navigate for your visitors.This tip will help keep visitors to your blog On your Blog.I actually found it hard to give this post a title that would explain what this tip does and how it works, i will give you some examples below to explain.However hard it may be to explain its very easy to add to your Blog.

Screenshot


Why change?

You may have 50 or more posts with the same label.If i did not make the change when someone clicks that label they would go to a page showing 50 Full Posts Your guess is as good as mine as to how long that page would take to load but you can be sure the visitor wont be waiting around to see.Its also better for the visitor to see the the results in a menu format as they will see a menu of what you have and that will bring them back.

How its done.

1.Click 'Layout'->'Edit html' for your blog.
(Tick 'Expand Widget Templates' box)

2.Find the following piece of code in your blogs template :
(Click'CTRL & F' For a search bar to find the code)


<b:include data='post' name='post'/>

3.Now Replace the code you found above with the code below :
 

<!--Labels in menu From:www.spiceupyourblog.com--><b:if cond='data:blog.homepageUrl !=data:blog.url'><b:if cond='data:blog.pageType != &quot;item&quot;'><a expr:href='data:post.url'><li/><data:post.title/></a><br/><br/><b:else/><b:include data='post' name='post'/></b:if><b:else/><b:include data='post' name='post'/></b:if><!--Labels in menu end-->

You have now changed how your label results are listed but also how your archive is listed and if you have a search bar on your blog results will be listed like this also.

Once you have changed the code click save and your done go test it out.

New Ready To Use Rss And Social Icons For Your Blog

Best Blogger Tips

New Ready To Use Rss And Social IcoIn this post i have a brand new set of stylish icons you can use on your blog for readers to subscribe and follow you on social platforms.I really liked the look of this icon set and it includes an icon for Google + (Plus) you can use for people to check out and follow you on Google's new social network.In total i have four icons here for Facebook, Twitter, Google Plus and your Rss Feed.However the complete set has 24 icons for other sites including YouTube, LinkedIn and Stumble Upon, the complete set can be found on Social Icon Studio.


Use The New Social Icons On Your Blog


Step 1. In Your Blogger dashboard click Design > Add a gadget > Choose Html/Javascript


Step 2. Copy and paste the following code into the html gadget then make the changes shown below.

<a href="http://facebook.com/everythings2012" imageanchor="1" style="margin-left: 1em; margin-right: 1em;"><img border="0" src="https://blogger.googleusercontent.com/img/b/R29vZ2xl/AVvXsEgSfcJsylHxtL1eO8OKUrEEls6CFYbGAizb58-0M7E6FTCwErq3lJ2lMhkX7aW9bVWayMJHvV_ARdvK8Ez57o_DNTuXu5npMsxl_TPKZmo-hBh-UCFzt2GLJjQN3_3oXJ0sQrWLCI1jAVE/s1600/facebook-30x43.png" /></a><a href="http://twitter.com/safdarhussain1" imageanchor="1" style="margin-left: 1em; margin-right: 1em;"><img border="0" src="https://blogger.googleusercontent.com/img/b/R29vZ2xl/AVvXsEiSOE5hLhL1RKjGxjK-mHxIh7Q_Apdsdvb3kx3wwWfXGO-P_OchUJf2P3fNKG_eYuVXqa11WDfHmXQvNUqMVKRYoxtRa7vpy2PNAc2xGRhbc56UqyWX7di8pl3UTXuY6GBss8QOcKrUo0M/s1600/twitter-30x43.png" /></a><a href="https://plus.google.com/u/0/your ID/" imageanchor="1" style="margin-left: 1em; margin-right: 1em;"><img border="0" src="https://blogger.googleusercontent.com/img/b/R29vZ2xl/AVvXsEisMFThCqo0lXefUlALRuzMdfzJAOxfd9_IXiNkirBAIrdzICH5Wz5xJHbv4aNfav_1H3RViSm4HXbloU0gLb3WjpiME_U2UP6h_FI171wyEvH-k_-CO3X5HtiH4Xqc6GGWb63fCo5C0ss/s1600/googleplus-30x43.png" /></a><a href="http://feeds.feedburner.com/yourblog" imageanchor="1" style="margin-left: 1em; margin-right: 1em;"><img border="0" src="https://blogger.googleusercontent.com/img/b/R29vZ2xl/AVvXsEiYNLGLZwM2OZFIFqDpciXcdXg2x5C7YlJTTKVOk_vZHrCQrfxoY2g5aH2smw5jK7_sULTTIz0FVL773cCpT4TlkU4eVhKINPm36a3Uci7oIw0GSm8Tmdr1fDoSXi4cjhjOE1wWArdXXl8/s1600/rss-30x43.png" /></a>
Note - Change the links in green to your social and feed links.

Step 3. Save the gadget and your done.

Monday, 2 January 2012

Releasing Highly Stylized “Contact Me” Form For Bloggers and Web Developers – Available For Free Of Charge!

Best Blogger Tips
Stylized-Contact-Me-Form-For blogger A Contact Form is a must for every website and weblog for feedback and suggestion purposes. There are many free email services that let you create free online Contact Forms but most of these forms are casual in look and appearance and are already used by millions of websites. Then how can you make your free form look any different from others?
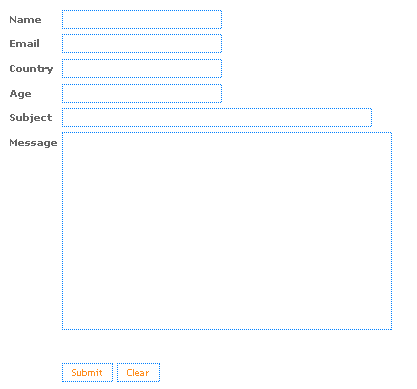
Well luckily after spending some hours of hard work I have successfully created a well stylized and optimized code that is unique in every aspect and that is capable enough to turn your free Contact form from this,


Normal looking contact form
to this,
MBT-Stylized-Contact-Me-Form
This new stylized version has CSS effects added to it. Text inside fields appear in different colours and the radio buttons change colour on mouse hover. Click Here to see it in action.
You need to follow two simple steps to get to the end result,
  1. Sign Up to create a Normal Contact Form
  2. Stylize Your Contact Form*


Sign Up To Create A Normal Contact Form

First and foremost you need an account at a free email service to create a normal looking contact form which will be controlled by the email service itself. Go to Email Me Forms and Sign Up for an account and then follow the steps below

Go To Control Panel

After you have created an account click the link “Create a New Form” at the right-hand pane under Control Panel as shown below,
email--me-form-control-pane

Then There will a total 7 steps which are illustrated in the images below. But Before going for step#1 kindly create a thank you page for your blog. This thank you page will appear when readers have successfully submitted their message to you using the contact form.  You can see my Thank you Page as an example. Make sure you give it an old date.
Once you have created it then follow each step below carefully,

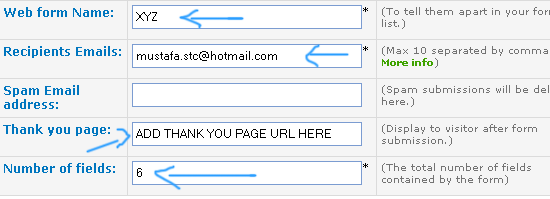
1.   Step#1

Add a name for your contact form, enter your email address, leave spam Email address emtpy, add your thank you page URL/link and let number of fields be 6.
EMAIL-FORM-STEP1
Hit Next

2.   Step#2

Change your options to the ones shown in the image below. As far as the Required? Portion is concerned, you can set it according to your will but set other options the way they are shown in the image below,
EMAIL-FORM-STEP2
Hit Next

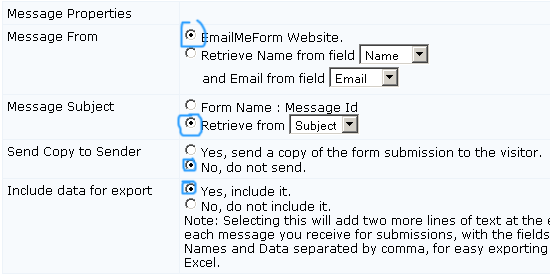
3.   Step#3

Change your options to exact ones below,
EMAIL-FORM-STEP3
Hit Next

4.   Step#4

For step 4 only edit the part as shown in the image below and leave the above portion as default. Make changes for regions indicated by blue arrows only.
EMAIL-FORM-STEP4
Hit Next

5.   Step#5

Follow the image below,
EMAIL-FORM-STEP5
Hit Next

6.   Step#6

And this is how your contact form looks like,
EMAIL-FORM-STEP6
Hit Next

7.   Step#7

Copy the link indicated in the image below. This is your the ID for your form. We only need this ID link and not the HTML code they provide because you deserve a better stylized code!
EMAIL-FORM-STEP7
Now jump to the next important part shared below

Stylize Your Contact Form

First you will need to add a CSS code to your selected blogspot template. To do this follow the steps below,
  1. Log into your blogger account
  2. Go to Layout > Edit HTML
  3. Back Up your template
  4. Search for ]]></b:skin>
  5. And finally add the code below just above ]]></b:skin>
input.mbt1 {
color:#FF8E1F;
font:10px 'trebuchet ms',helvetica,sans-serif;
background-color:#fff;
border:1px dotted #0080ff;
}
input.mbt1hov {
color:#0080ff;
font: bold 10px 'trebuchet ms',helvetica,sans-serif;
border:1px solid;
}
textarea {width:100%; color:#0080ff;
font:12px 'trebuchet ms',helvetica,sans-serif;
background-color:#fff;
border:1px dotted #0080ff; }
textareahov { width:100%;
color:#0080ff;
}
  • Save Your template
Now open your blogger Editor and create a new post entitled as “Contact Me” . You can give it any title you like. Give this post an old date so that it should not appear in recent posts.
  • First Create a Welcome Note  as shown in the image below. You can see my Welcome Note as an example.
Blogger-Compose-Mode
  • Then Click the Edit HTML tab at the top right-hand corner and add the code shared below just below the visible text.
<form action="PASTE THE EMAIL ME FORM ID LINK HERE" charset="UTF-8" enctype="multipart/form-data" method="post"><table bg="" border="0" cellpadding="2" cellspacing="0" style="color:white;"><tbody><tr><td><span style="font-family:Verdana;font-size:85%;color:black;"></span><div id="mainmsg"></div></td></tr></tbody></table><table bg=""border="0" cellpadding="2" cellspacing="0" style="color:white;"><tbody><tr valign="top"><td nowrap="nowrap"><span style="font-weight: bold; color: rgb(102, 102, 102);font-family:Verdana;font-size:10px;">Name</span></td><td><input class="mbt1" maxlength="100" name="FieldData0" size="30" value="" type="text"> </td></tr><tr valign="top"><td nowrap="nowrap"><span style="font-weight: bold; color: rgb(102, 102, 102);font-family:Verdana;font-size:10px;">Email</span></td><td><input class="mbt1" maxlength="100" name="FieldData1" size="30" value="" type="text"> </td></tr><tr valign="top"><td nowrap="nowrap"><span style="font-weight: bold; color: rgb(102, 102, 102);font-family:Verdana;font-size:10px;">Country</span></td><td><input class="mbt1" maxlength="100" name="FieldData2" size="30" value="" type="text"></td></tr><tr valign="top"><td nowrap="nowrap"><span style="font-weight: bold; color: rgb(102, 102, 102);font-family:Verdana;font-size:10px;">Age</span></td><td><input class="mbt1" maxlength="100" name="FieldData3" size="30" value="" type="text"></td></tr><tr valign="top"><td nowrap="nowrap"><span style="font-weight: bold; color: rgb(102, 102, 102);font-family:Verdana;font-size:10px;">Subject</span></td><td><input class="mbt1" maxlength="100" name="FieldData4" size="60" value="" type="text"> </td></tr><tr valign="top"><td nowrap="nowrap"><span style="font-weight: bold; color: rgb(102, 102, 102);font-family:Verdana;font-size:10px;"  >Message</span></td><td><textarea cols="60" name="FieldData5" rows="10"></textarea></td></tr><tr><td colspan="2"></td></tr><tr><td></td><td align="left"><input maxlength="100 " name="hida2" size="3" style="display: none;" value="" type="text"><input onmouseover="this.className='mbt1 mbt1hov'" onmouseout="this.className='mbt1'" class="mbt1" name="Submit" value="Submit " type="submit"> <input onmouseover="this.className='mbt1 mbt1hov'" onmouseout="this.className='mbt1'" class="mbt1" name="Clear" value="  Clear  " type="reset"></td></tr><tr><td colspan="2" align="center"></td></tr></tbody></table></form>


Kindly replace the bolded green text in the code above with the URL of your contact form. Copy this code as it is and don’t try to edit it. Paste it as instructed in the image below,
EDIT-HTML-MODE
  • That’s it, You are Done! Click the Publish Button and see a beautiful contact form on your weblog
Twitter Bird Gadget